Beach Toe Nails for Summer 2025: Pretty Designs, Bold Colors & Vacation Vibes

Summer is all about fun, relaxation, and showing off your vibrant personality—and what better way to do that than with stunning beach toe nails? Whether you’re hitting the beach, lounging poolside, or enjoying a tropical getaway, your toes can be a bold fashion statement in themselves. For Summer 2025, it’s all about pretty designs, bright colors, and playful, vacation-ready vibes. This season, let your feet take center stage with the hottest nail trends, from neon pops to tropical art. Plus, we’ll dive into the best tips on how to apply these styles to make sure they last all summer long!
1. Bold & Bright Colors: The Trend That Screams Summer
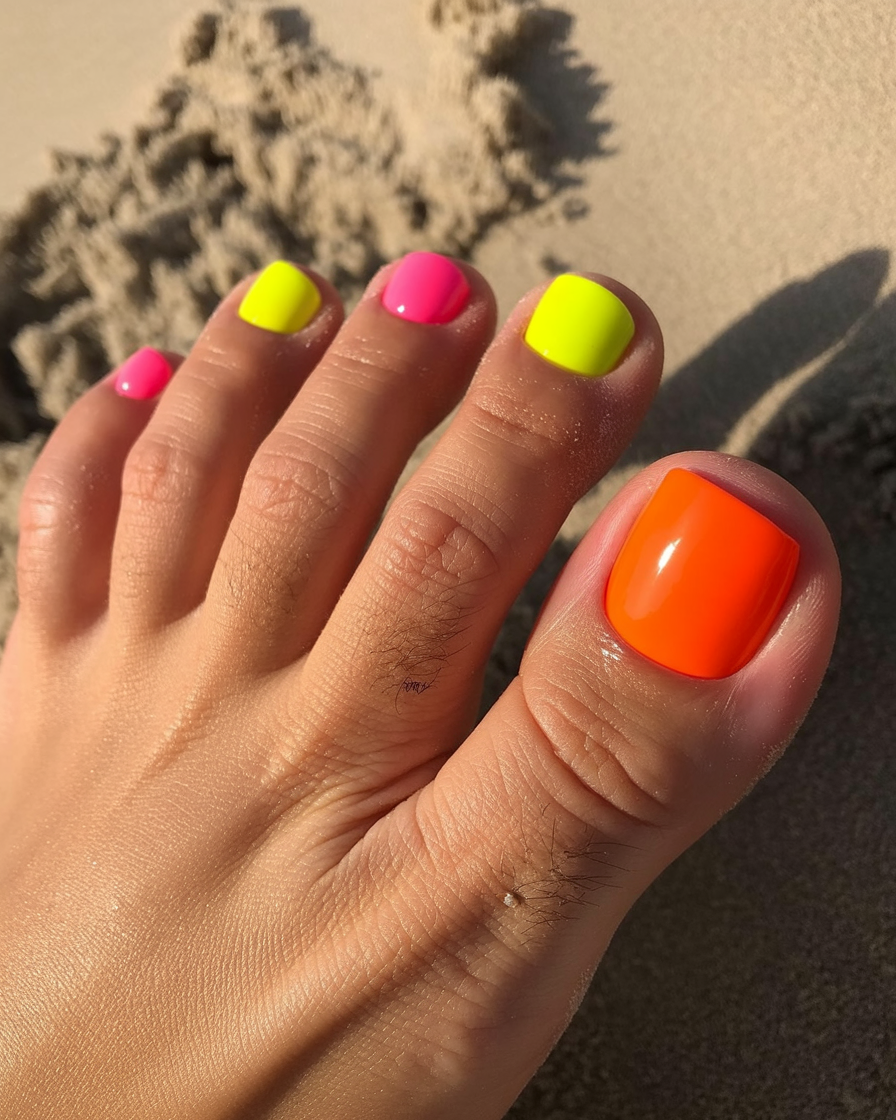
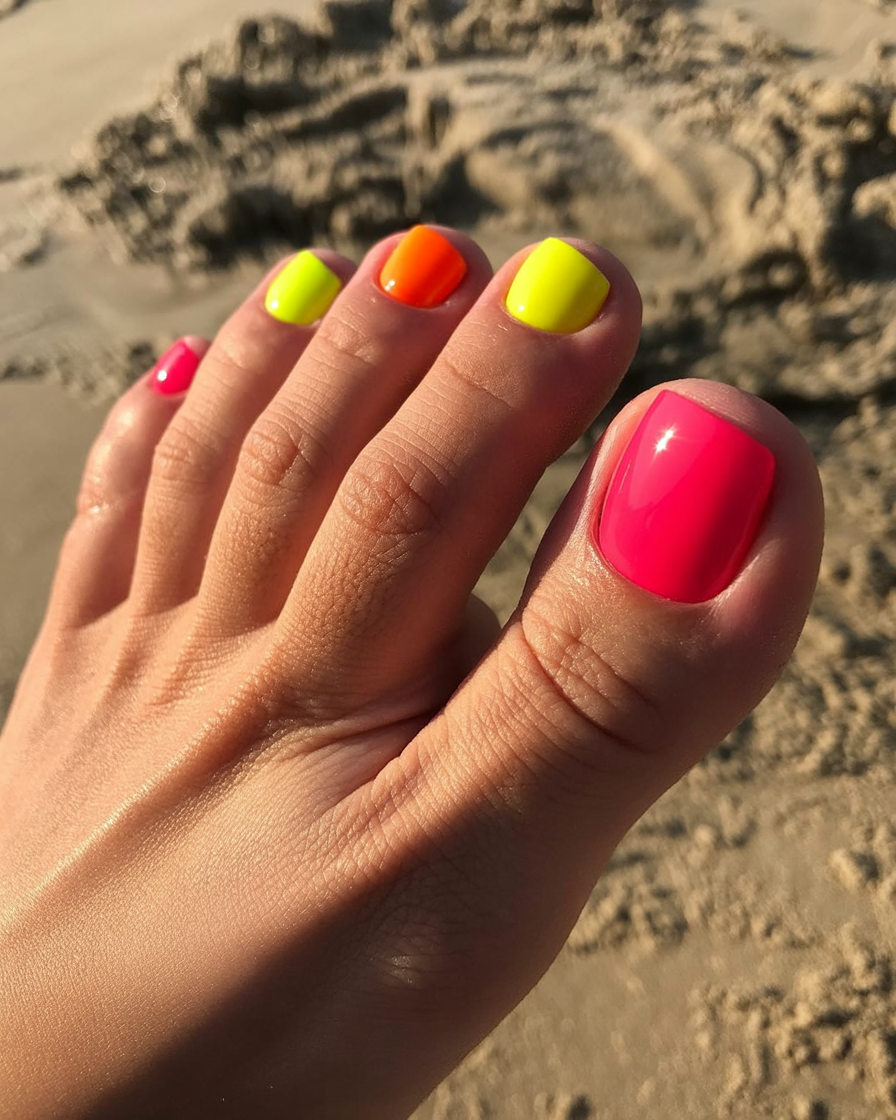
When it comes to beach toe nails, bold, bright colors are a must. Summer 2025 is all about embracing fun and vibrant hues that make a statement. Neon tones, pastel shades, and everything in between are perfect for showing off your toes in the sun. Whether you’re someone who loves daring shades or prefers something more subdued, there’s a color out there for you.
1.1 Neon Hues: Stand Out in the Sand
Neon colors have made a major comeback for 2025, and there’s no better time to embrace them than at the beach. Bright electric pinks, zesty oranges, and fiery reds are perfect for those days when you want to show off bold nails that scream vacation vibes. These colors pop against tanned skin and make your toes look absolutely stunning under the summer sun.
How to Apply:
Start by prepping your toes with a good clean and a base coat to prevent staining. For neon shades, it’s best to apply a white base coat first—it’ll help the neon pigments stand out more. Apply two coats of the neon polish for a rich, opaque color. Always finish with a high-gloss topcoat to give your toes that shiny, polished look.
1.2 Pastels: Subtle & Soft Beach Elegance
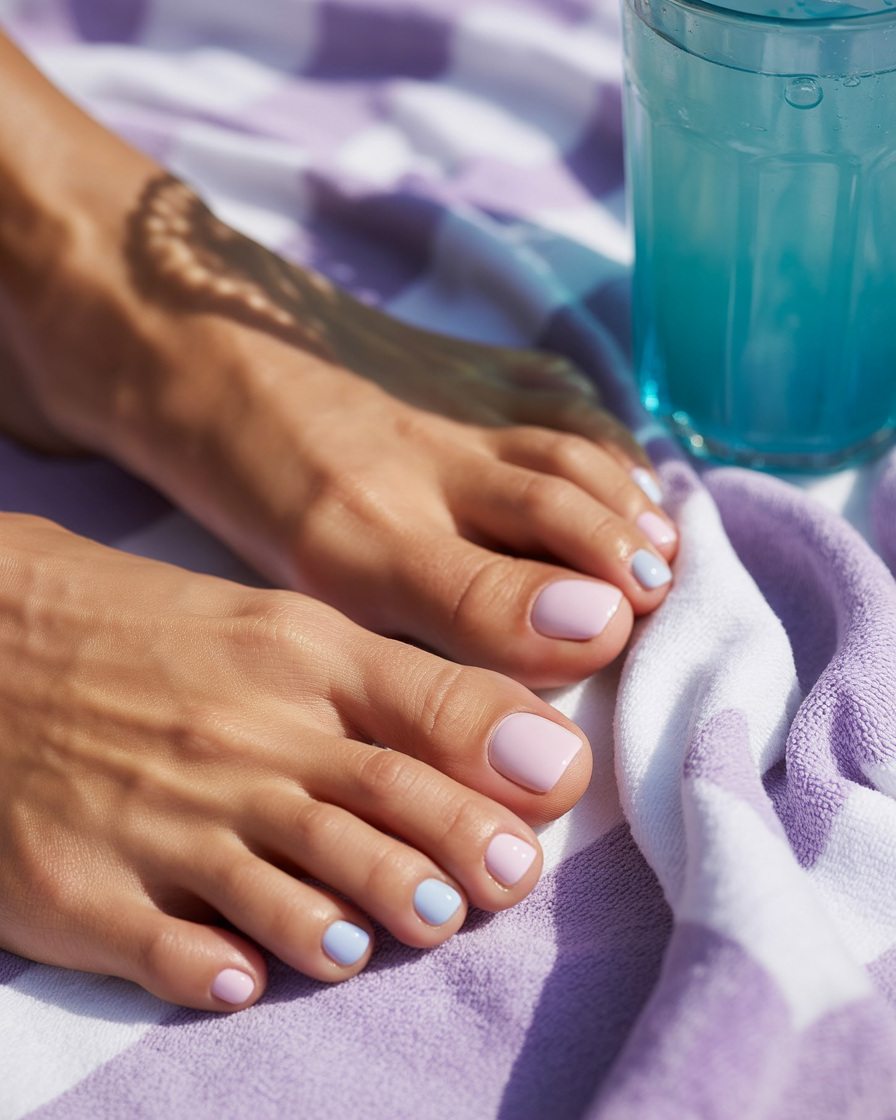
Not a fan of bold neon? No worries! Soft pastel shades are a perfect alternative for a more serene, delicate vibe. Light pinks, lavender, mint green, and baby blue are ideal for those looking for a more sophisticated beachy look. These colors can give off an elegant, almost ethereal feel—perfect for that sunset stroll on the beach or an outdoor brunch.
How to Apply:
Pastels need smooth application to look their best, so be sure to start with a clear base coat. You’ll want to apply two coats of pastel polish to get an even finish, allowing the first coat to dry completely before adding the second. To keep it extra chic, finish with a glossy topcoat for added shine.
2. Tropical Nail Art: Bring the Beach to Your Toes
For Summer 2025, tropical nail art is definitely a must-try. Think palm trees, sunsets, and ocean waves—everything that makes a beach vacation unforgettable. Nail art allows you to get creative with your beach toe nails, and you can go as detailed or as subtle as you want.
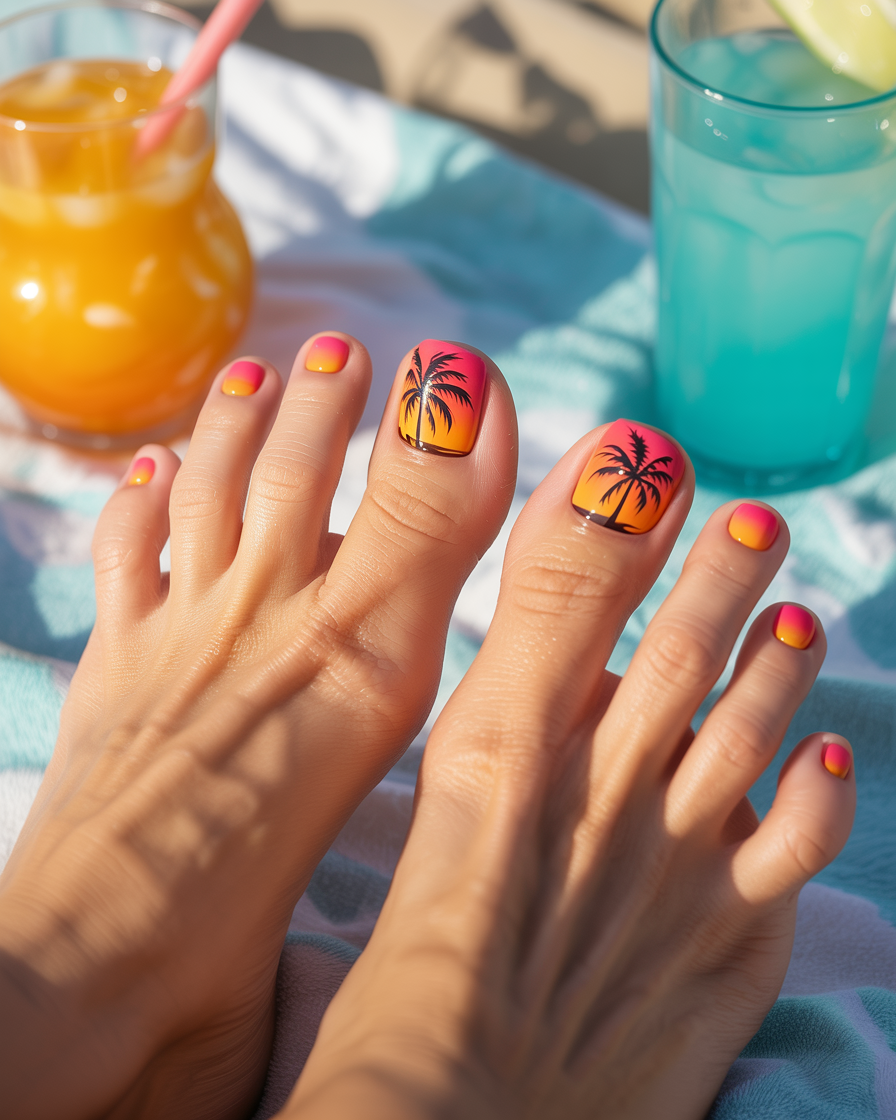
2.1 Palm Tree Paradise
Palm trees are synonymous with beach vibes, making them an ideal design for your toes. A silhouette of palm trees against a bright sunset or ocean backdrop is a classic tropical look. For added glam, use gold accents or a soft gradient background for a more dynamic effect.
How to Apply:
You can achieve a palm tree design using a fine nail art brush or dotting tool. Start with a base color of sunset oranges, yellows, and pinks to create the gradient, and once it’s dry, use black polish for the palm trees. For extra dimension, try adding a glitter accent to the sunset sky.
2.2 Sunset Magic: A Perfect Blend of Warm Tones
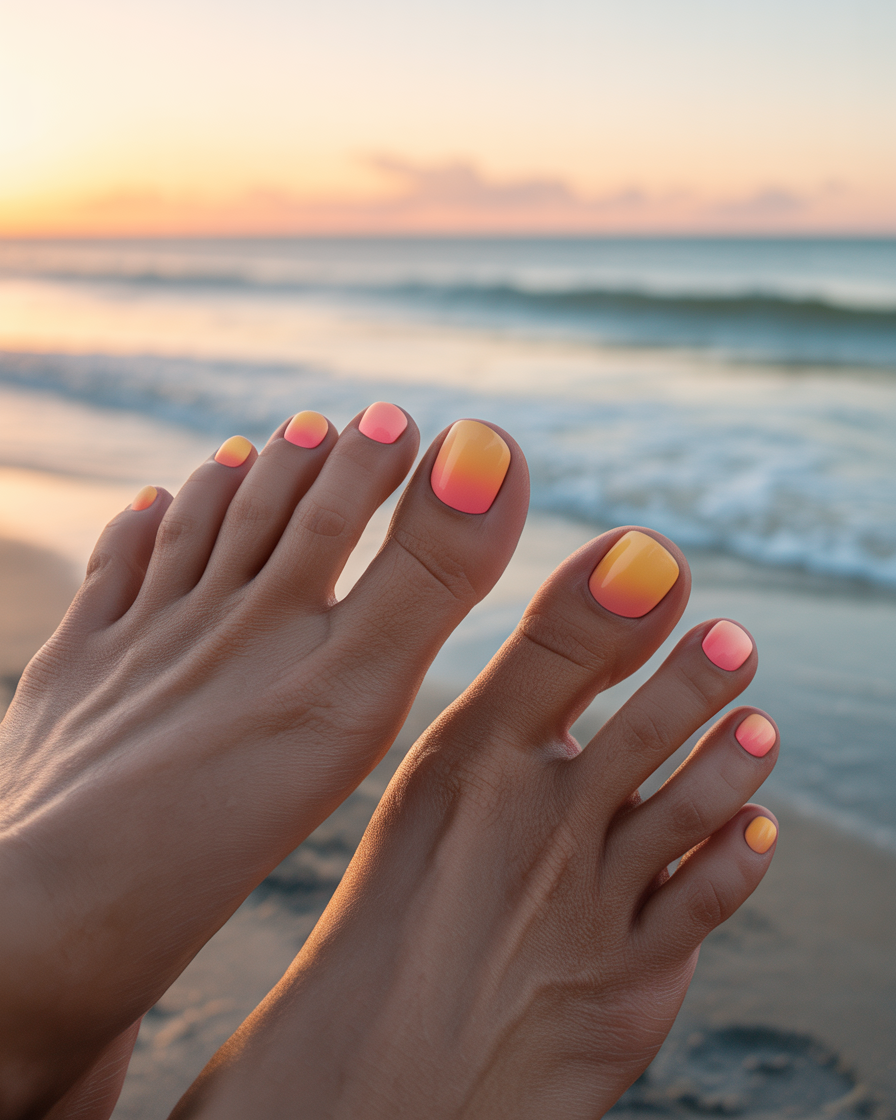
Nothing says vacation like a beach sunset, and what better way to incorporate it than with a gorgeous sunset gradient design on your toes? Using warm oranges, pinks, and yellows, you can create a seamless ombre effect that mimics the sky just before the sun dips below the horizon.
How to Apply:
Create this gradient by using a makeup sponge for a smooth transition of colors. Start with the lightest shade at the cuticle and sponge on the darker tones toward the tips of your toes. Let the colors blend gently for a soft, sunset-inspired ombre effect. Finish with a clear topcoat to lock in the beautiful gradient.
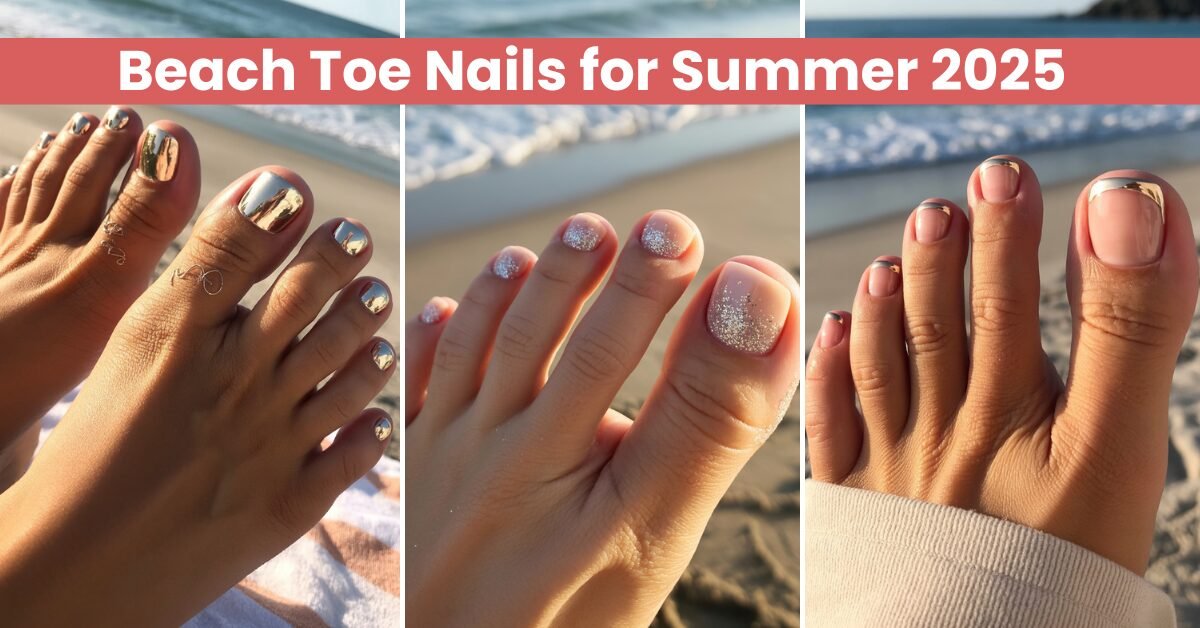
3. Metallic Accents: A Touch of Glam
For those who love a bit of shimmer and shine, metallic accents are a great way to add some glitz to your beach toe nails. Whether you opt for gold, silver, or even chrome, a little sparkle can go a long way in making your toes shine like the summer sun.
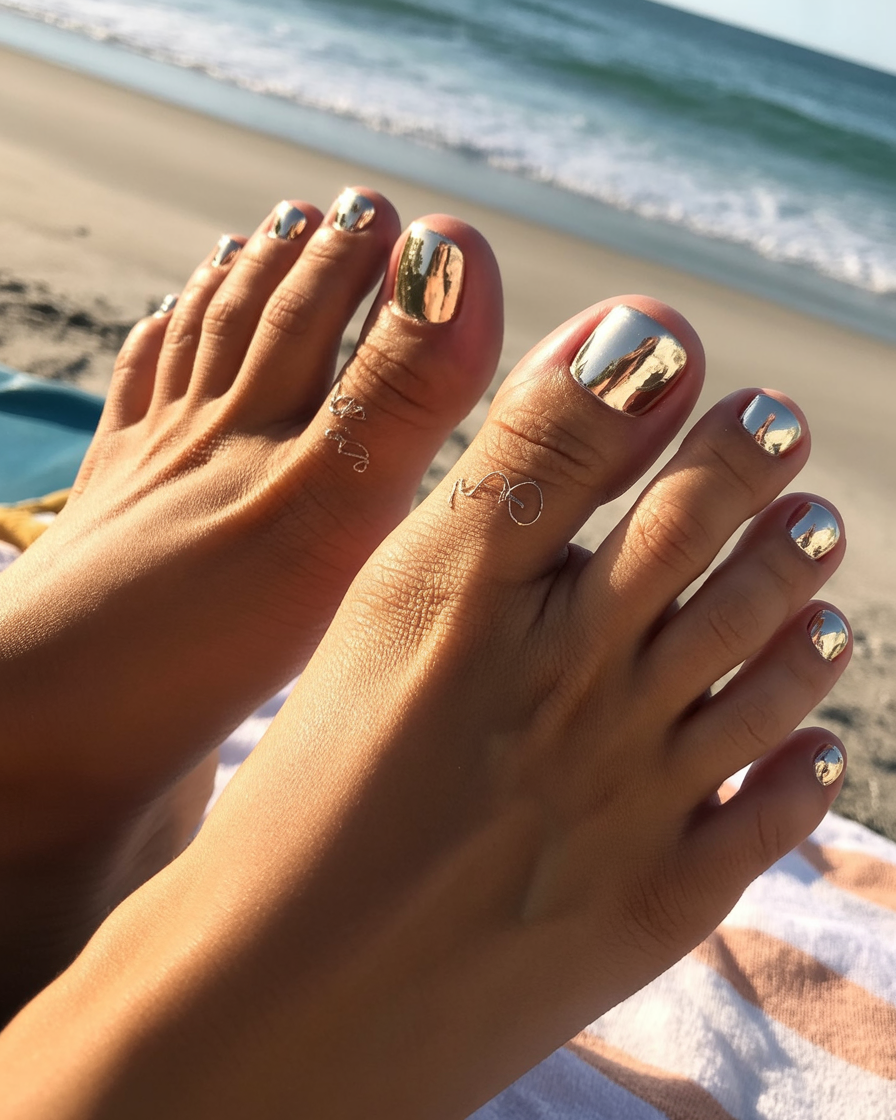
3.1 Gold & Silver Foil: Shine Bright Like a Diamond
Metallic foil has been all the rage in the nail world for a while, and for good reason. These shiny accents catch the light beautifully, adding an elegant yet edgy vibe to your beach toe nails. Apply them at the tips for a modern French tip look or use them to create patterns like stars or waves.
How to Apply:
Use small pieces of gold or silver foil, gently pressing them onto the nail using a brush or your fingers. You can apply them to the tips of your toes for a trendy twist on the classic French tip, or scatter them across your nail for a more random effect. Finish with a topcoat to keep everything in place.
3.2 Glitter Gradients: Sparkle Like the Ocean
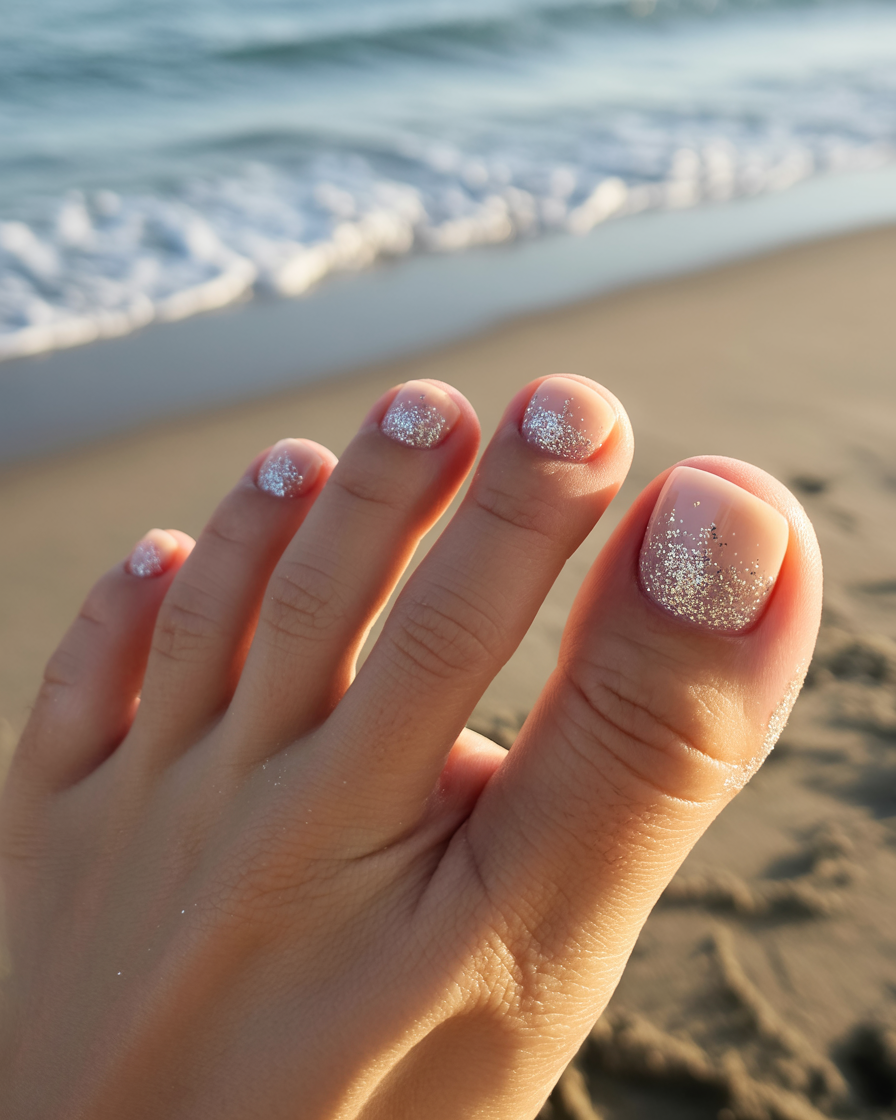
If you love the sparkle of glitter but want a more subtle look, a glitter gradient is perfect for beach toe nails. Start with a nude or pastel base, and add a fine layer of glitter from the tips downward for a soft, sparkling effect. The gradient effect mimics the shimmer of sunlight on water—elegant and beautiful.
How to Apply:
For a smooth glitter gradient, begin by applying a solid base color and let it dry. Then, use a glitter polish, applying it to the tips of your toes and gradually building the glitter as you move towards the cuticle. Finish with a clear topcoat to ensure that the glitter stays in place and your nails stay glossy.
4. Minimalist Chic: Simple and Sleek Designs
Not everyone is into loud, flashy designs, and that’s perfectly fine! Minimalist beach toe nails can be equally stylish and chic. Think clean lines, geometric patterns, and subtle metallic accents. Sometimes, less is more.
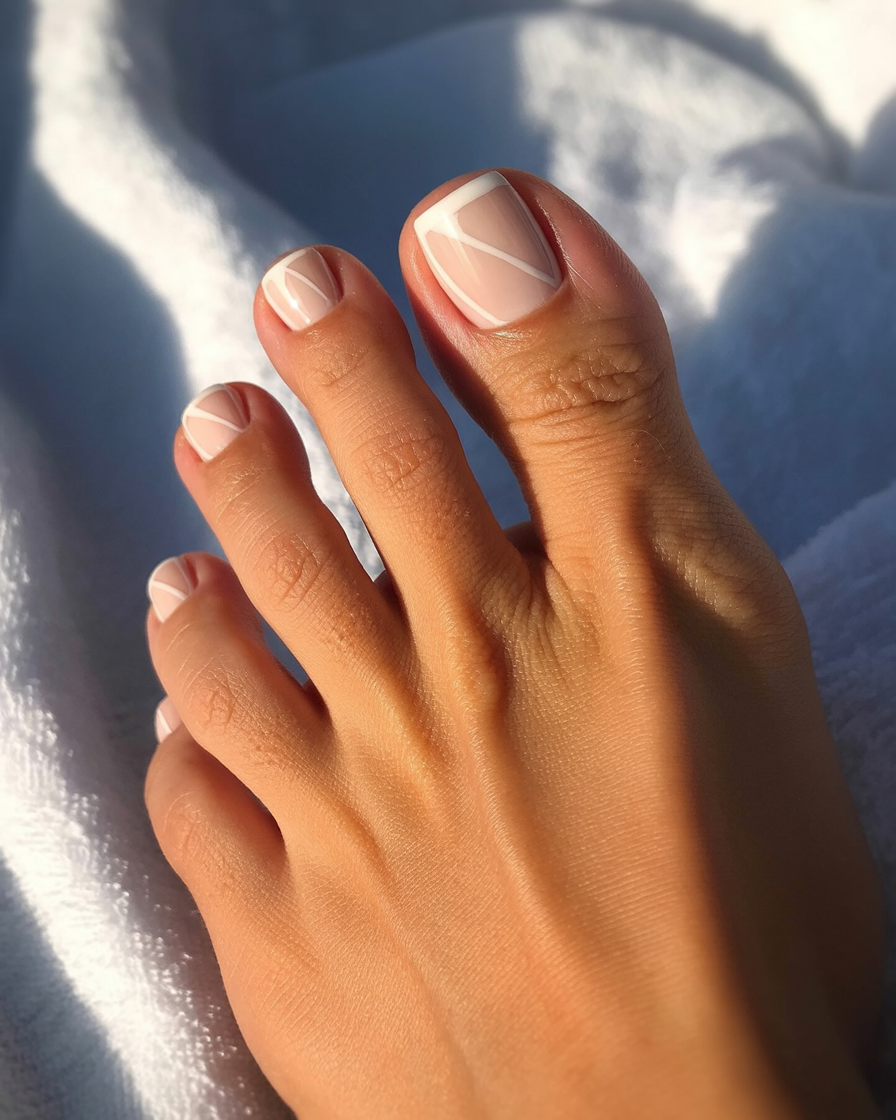
4.1 Negative Space Designs: Modern and Effortless
Negative space designs, where parts of the nail are left blank, are a perfect way to achieve a modern, minimalist look. This trend is all about geometric patterns, sharp lines, and subtle elegance. It’s ideal for those who want to keep their look understated yet on-trend.
How to Apply:
Start with a neutral base coat (like white or nude). Use tape to block off areas that you want to remain bare, and paint the rest with a contrasting color. You can create clean lines or simple geometric shapes—whatever suits your style. Finish off with a glossy topcoat.
5. French Tips with a Twist: Classic Yet Fun
French tips are a classic, timeless design, but for 2025, you can add your own twist! Think neon French tips, metallic edges, or even textured tips to make this timeless style feel fresh and modern. French tips are no longer just white—they’ve evolved into a fun canvas for all types of creativity, adding personality and flair to your beach toe nails.
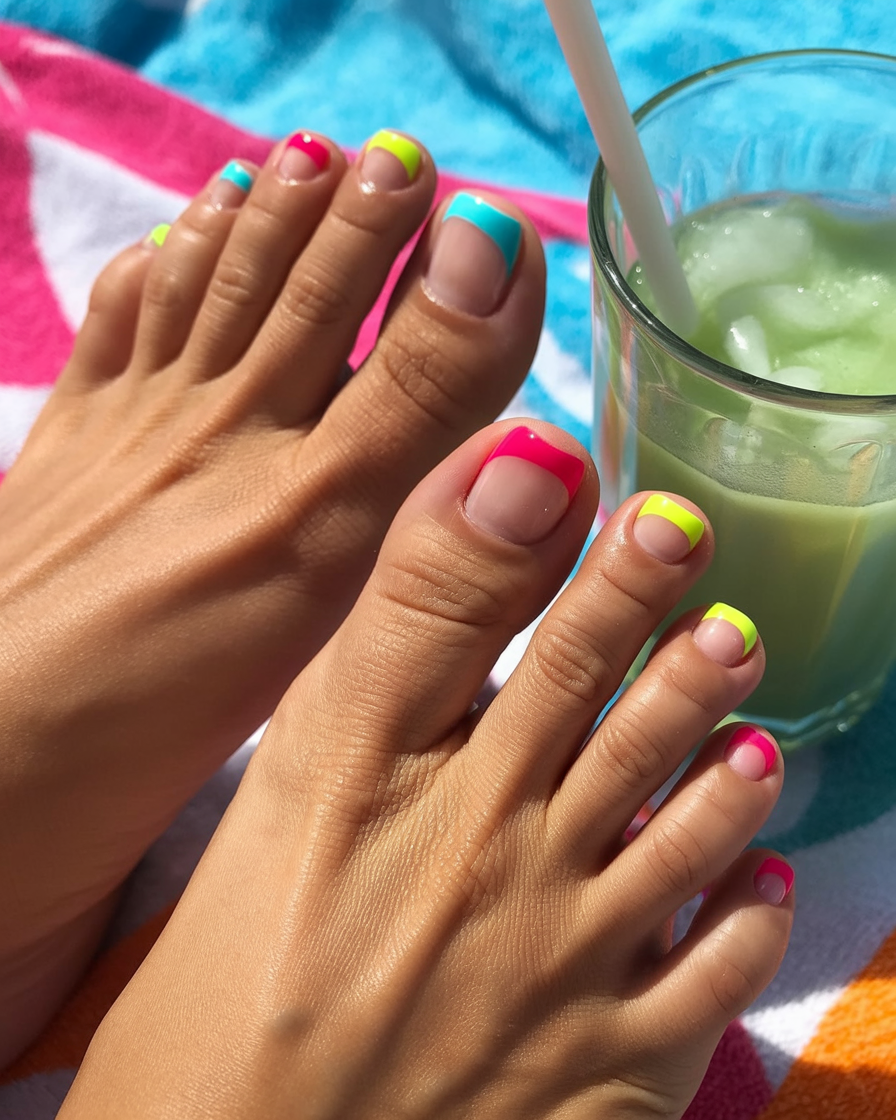
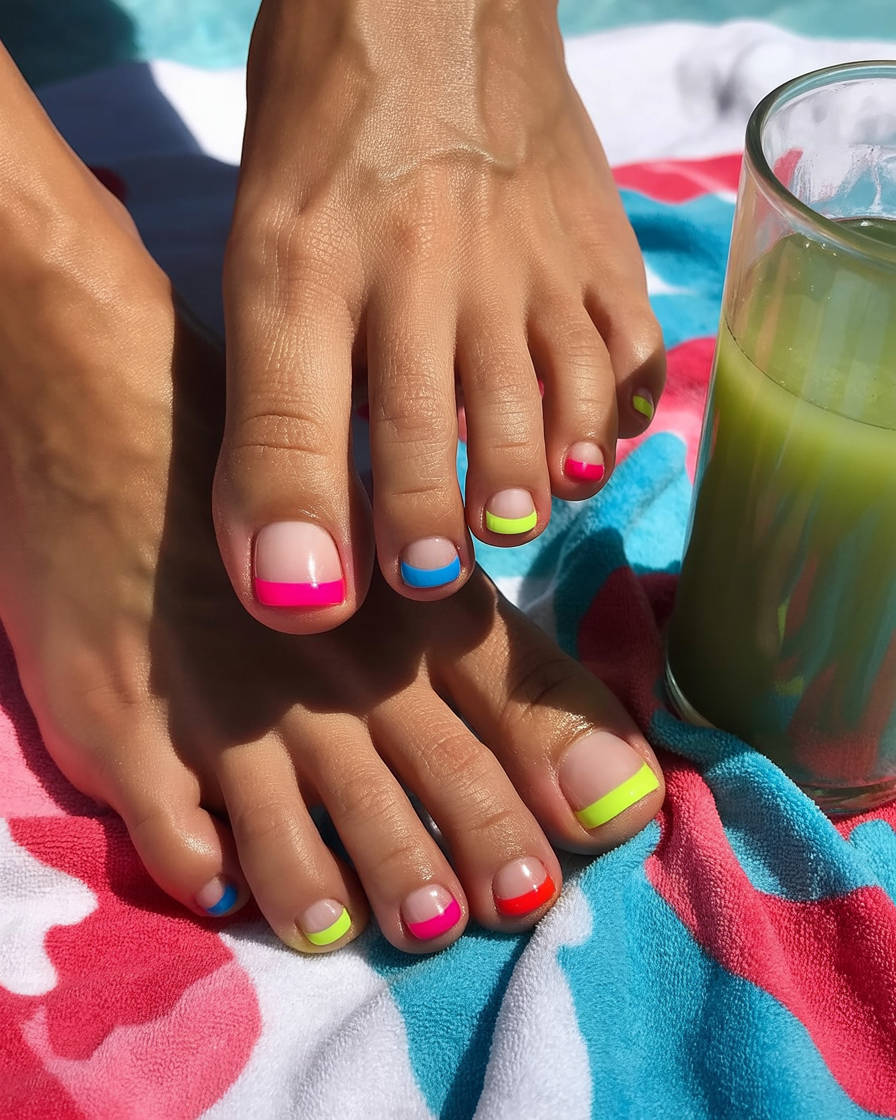
5.1 Bold Color Tips: A Playful Take on Classic French Tips
Instead of the usual white tips, try bold colors for a more modern, playful look. Neon colors, pastel tips, or even holographic shades are perfect for a beach-ready style. Pair these colorful tips with a neutral base, like a nude or clear polish, to keep the look fresh and trendy. It’s the perfect design for those who want to stand out while keeping things elegant.
How to Apply:
Start by applying a nude or light neutral base color and let it dry. Once dry, apply tape along the edge of the nail to create a clean line for the tips. You can choose a neon or pastel color, such as electric pink, sky blue, or lavender. Carefully paint the tips with your chosen color, making sure the lines are neat and sharp. You can even try multiple colors for each toe for a more playful look. Once you’re happy with the design, finish it off with a high-gloss topcoat to lock in the shine and ensure the tips stay crisp.
5.2 Metallic Edge Tips: Adding a Touch of Glam

For a more sophisticated twist on the classic French tip, try adding metallic accents to the edge of your toe nails. Gold, silver, or chrome tips will give your nails a refined and elegant look that still maintains that playful beach vibe. Perfect for evening beach walks or a chic dinner by the shore!
How to Apply:
Start by applying a base coat in a neutral color, like a soft pink or beige. After it dries, tape off the tips of your nails to create clean, straight lines. Choose a metallic shade such as gold, silver, or even chrome, and carefully paint the tips. You can also opt for a gradient metallic effect, starting from the tip and blending downward for an added layer of style. Finish with a shiny topcoat to seal the metallic look and make your toes gleam in the sunlight.
5.3 Textured French Tips: Going Beyond Smooth Lines

If you love the French tip look but want to add an extra element of surprise, textured French tips are a fun option. Instead of smooth, solid lines, you can add glitter, small rhinestones, or even textured accents like sand or crushed seashells to the tips of your nails. This design brings a fun, beachy element to the classic French tip, giving it a unique twist.
How to Apply:
Start by applying a neutral base and let it dry completely. For textured tips, use a clear base and sprinkle fine glitter, sand, or tiny rhinestones over the tips while they’re still wet. Gently press the elements into place, making sure they’re evenly distributed. You can also experiment with crushed seashells or beach-themed embellishments for a truly unique, textured design. Seal it all in with a topcoat to ensure the texture stays intact and your design lasts longer.